Difference between revisions of "Bus"
From Tycoon Gaming
(→Routes) |
m (→Milestones: Behemoth and Htomeheb requirement changed to 42. Bumped up.) |
||
| (57 intermediate revisions by 28 users not shown) | |||
| Line 1: | Line 1: | ||
{{otherlang | {{otherlang | ||
| noborder=true | | noborder=true | ||
| + | | hi=HI:Bus | ||
| + | | de=DE:Bus | ||
| + | | dk=DK:Bus | ||
| + | | fr=FR:Bus | ||
| nl=NL:Bus | | nl=NL:Bus | ||
| es=ES:Bus | | es=ES:Bus | ||
| + | | pl=PL:Bus | ||
| + | | pt-br=PT-BR:Bus | ||
| + | | ar=AR:Bus | ||
| + | | cs=CS:Bus | ||
| + | | zh-cn=ZH-CN:Bus | ||
| + | | id=ID:Bus | ||
| + | | kr=KR:Bus | ||
| + | | tr=TR:Bus | ||
| + | | ru=RU:Bus | ||
| + | |||
}} | }} | ||
| − | |||
<!-- | <!-- | ||
{{Information | {{Information | ||
| Line 12: | Line 25: | ||
}} | }} | ||
--> | --> | ||
| − | <blockquote>The '''''Bus Driver''' {{Icon|Bus emoji}} job (and skill) is a small and | + | <blockquote>The '''''Bus Driver''' {{Icon|Bus emoji}} job (and skill) is a small and calm job. You transport passengers anywhere and everywhere, depending on the level of your bus. It is an easy job for new players in Transport Tycoon!''</blockquote> |
| − | ==Getting Started== | + | == Getting Started == |
| − | # | + | # Go to the [[Job Center|Job Center]] {{Icon|Job Center}} and choose the bus driver job. |
| − | # | + | # Buy a bus from the [[Car Dealer|Car Dealership]] {{Icon|Car Dealer}}. |
# Drive to one of the bus stations {{Icon|Bus Icon}}. | # Drive to one of the bus stations {{Icon|Bus Icon}}. | ||
| − | #At the bus station | + | # At the bus station, there you can start a route with your bus. |
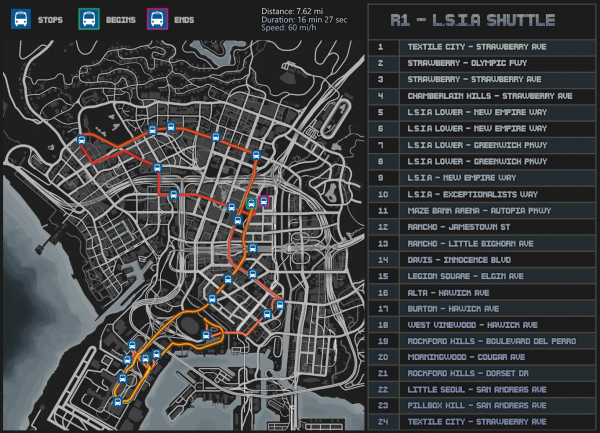
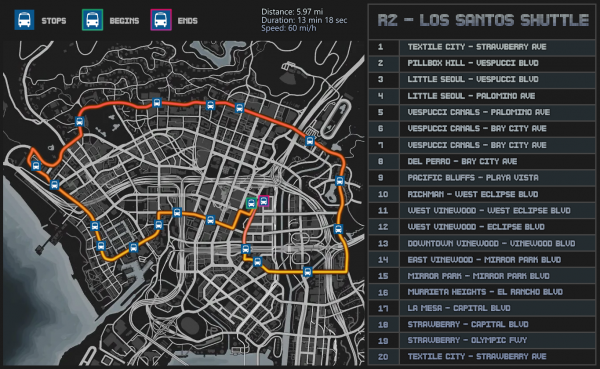
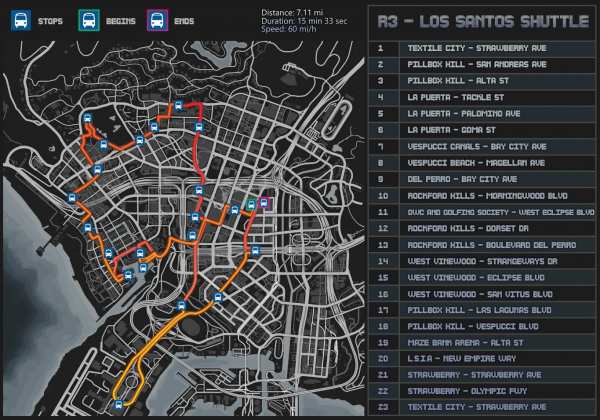
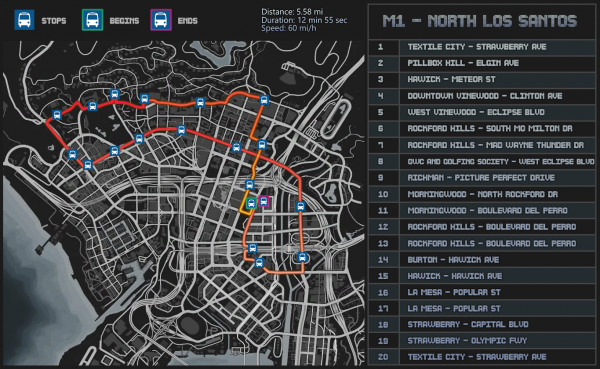
| − | # Stop at the | + | # Stop at the locations on your map, follow the line on your map for the correct stations {{Icon|Bus Stop}} and wait for passengers to get in and out. |
| − | #You | + | # You get paid during, and at the end of your route. |
| − | + | {{Note|If you can not afford to buy a bus, find one on the street, at the bus station, near LSIA or ask someone to borrow their bus!|reminder}} | |
| − | The number of | + | The number of stops on your route determines how much XP you get at the end of your route. |
| − | Money | + | Money is still different and depends on the number of stops you have on the route, but two things are for sure, the higher level your bus is, the more money, EXP, and EXP Tokens you will earn |
| − | Note | + | {{Note|Not every bus can do every route, for example, due to low roofs.|info}} |
| − | ==Vehicles== | + | == Vehicles == |
| − | { | + | {{Car_Dealer/Job_Vehicles/Bus}} |
| − | |||
| − | |||
| − | |||
| − | |||
| − | |||
| − | |||
| − | |||
| − | |||
| − | |||
| − | |||
| − | |||
| − | |||
| − | |||
| − | |||
| − | |||
| − | |||
| − | |||
| − | |||
| − | |||
| − | |||
| − | |||
| − | |||
| − | |||
| − | |||
| − | |||
| − | |||
| − | |||
| − | |||
| − | |||
| − | |||
| − | |||
| − | |||
| − | |||
| − | |||
| − | |||
| − | |||
| − | |||
| − | |||
| − | |||
| − | |||
| − | |||
| − | |||
| − | |||
| − | |||
| − | |||
| − | |||
| − | |||
| − | |||
| − | |||
| − | |||
| − | |||
| − | |||
| − | |||
| − | |||
| − | |||
| − | |||
| − | |||
| − | |||
| − | |||
| − | |||
| − | |||
| − | |||
| − | |||
| − | |||
| − | |||
| − | |||
| − | |||
| − | |||
| − | |||
| − | |||
| − | |||
| − | |||
| − | |||
| − | |||
| − | |||
| − | |||
| − | |||
| − | |||
| − | |||
| − | |||
| − | |||
| − | |||
| − | |||
| − | |||
| − | |||
| − | |||
| − | |||
| − | |||
| − | |||
| − | |||
| − | |||
| − | ==Routes == | + | == Routes == |
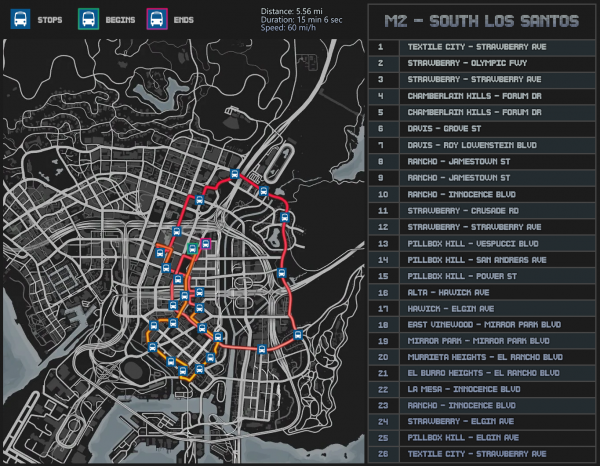
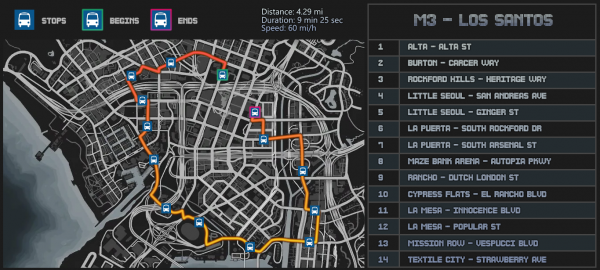
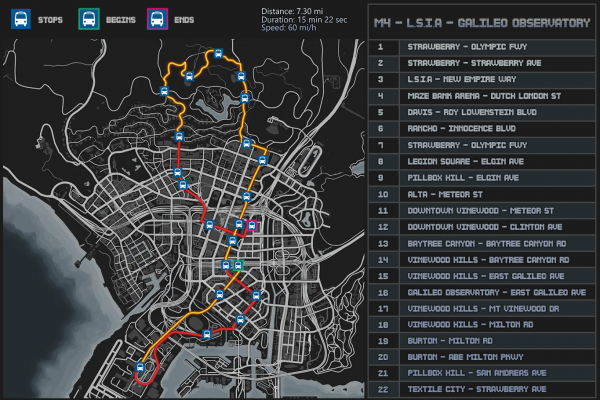
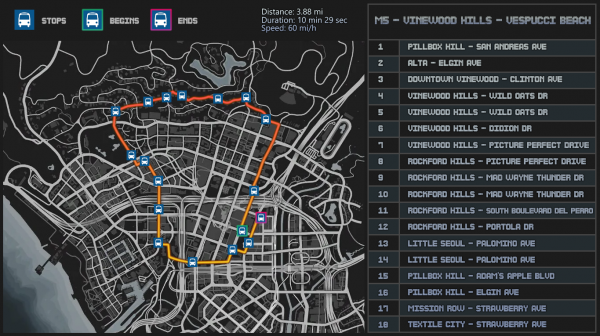
| + | {{note|Hover over the route names to see the route maps.}} | ||
| + | === Los Santos === | ||
<!-- | <!-- | ||
ata Gathering correlation Fares // Payment & XP (Premium 50% ,Discord connect+voice 10% ,faction 5%) | ata Gathering correlation Fares // Payment & XP (Premium 50% ,Discord connect+voice 10% ,faction 5%) | ||
| Line 134: | Line 58: | ||
Information about the Bus job: | Information about the Bus job: | ||
| − | http://server.tycoon.community:30125/status/config/ | + | http://server.tycoon.community:30125/status/config/omni_bus |
--> | --> | ||
{| class="article-table sortable" style="width: 100%;" | {| class="article-table sortable" style="width: 100%;" | ||
| Line 143: | Line 67: | ||
! data-sort-type="number" style="width: 10%" |'''Stops''' | ! data-sort-type="number" style="width: 10%" |'''Stops''' | ||
|- | |- | ||
| − | |<div class="tooltip">R1: L.S.I.A Shuttle<span>[[File:R1 - L.S.I.A Shuttle.png|none|thumb| | + | |<div class="tooltip">R1: L.S.I.A Shuttle<span>[[File:R1 - L.S.I.A Shuttle.png|none|thumb|600px]]</span></div> |
|Los Santos | |Los Santos | ||
|1 | |1 | ||
|1 | |1 | ||
| − | | | + | |24 |
|- | |- | ||
| − | |<div class="tooltip">R2: Los Santos Shuttle<span>[[File:R2 - Los Santos Shuttle.png|none|thumb| | + | |<div class="tooltip">R2: Los Santos Shuttle<span>[[File:R2 - Los Santos Shuttle.png|none|thumb|600px]]</span></div> |
|Los Santos | |Los Santos | ||
|1 | |1 | ||
|1 | |1 | ||
| − | | | + | |20 |
|- | |- | ||
| − | |R3: Los Santos Shuttle | + | |<div class="tooltip">R3: Los Santos Shuttle<span>[[File:R3 - Los Santos Shuttle.png|none|thumb|600px]]</span></div> |
|Los Santos | |Los Santos | ||
|1 | |1 | ||
|1 | |1 | ||
| − | | | + | |23 |
| + | |- | ||
| + | |<div class="tooltip">M1: North Los Santos<span>[[File:M1 - North Los Santos.png|none|thumb|600px]]</span></div> | ||
| + | |Los Santos | ||
| + | |2 | ||
| + | |7 | ||
| + | |20 | ||
|- | |- | ||
| − | |<div class="tooltip"> | + | |<div class="tooltip">M2: South Los Santos<span>[[File:M2 - South Los Santos.png|none|thumb|600px]]</span></div> |
|Los Santos | |Los Santos | ||
|2 | |2 | ||
| − | | | + | |7 |
| − | | | + | |26 |
|- | |- | ||
| − | |<div class="tooltip"> | + | |<div class="tooltip">M3: Los Santos<span>[[File:M3 - Los Santos.png|none|thumb|600px]]</span></div> |
|Los Santos | |Los Santos | ||
|2 | |2 | ||
| + | |7 | ||
|14 | |14 | ||
| − | |||
|- | |- | ||
| − | |<div class="tooltip"> | + | |<div class="tooltip">M4: LSIA - Galileo Observatory<span>[[File:M4 - L.S.I.A - Galileo Observatory.png|none|thumb|600px]]</span></div> |
|Los Santos | |Los Santos | ||
|2 | |2 | ||
| − | | | + | |7 |
| − | | | + | |22 |
|- | |- | ||
| − | | | + | |<div class="tooltip">M5: Vinewood Hills - Vespucci Beach<span>[[File:M5 - Vinewood Hills - Vespucci Beach.png|none|thumb|600px]]</span></div> |
|Los Santos | |Los Santos | ||
|2 | |2 | ||
| − | | | + | |7 |
| − | | | + | |18 |
|- | |- | ||
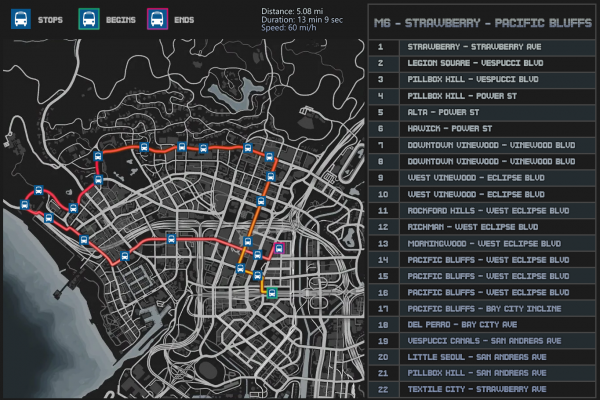
| − | | | + | |<div class="tooltip">M6: Strawberry - Pacific Bluffs<span>[[File:M6 - Strawberry - Pacific Bluffs.png|none|thumb|600px]]</span></div> |
|Los Santos | |Los Santos | ||
|2 | |2 | ||
| + | |7 | ||
| + | |22 | ||
| + | |- | ||
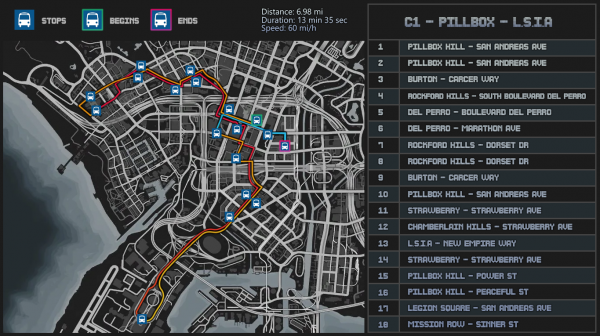
| + | |<div class="tooltip">C1: Pillbox - L.S.I.A<span>[[File:C1 - Pillbox - LSIA.png|none|thumb|600px]]</span></div> | ||
| + | |Los Santos | ||
| + | |3 | ||
|14 | |14 | ||
| − | | | + | |18 |
|- | |- | ||
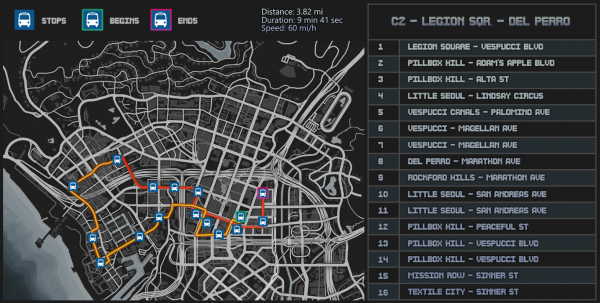
| − | |<div class="tooltip"> | + | |<div class="tooltip">C2: Legion Sqr. - Del Perro<span>[[File:C2 - Legion Sqr. - Del Perro.png|none|thumb|600px]]</span></div> |
|Los Santos | |Los Santos | ||
|3 | |3 | ||
| − | | | + | |14 |
| − | | | + | |16 |
|- | |- | ||
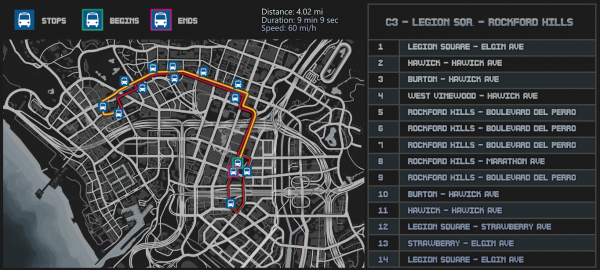
| − | |<div class="tooltip"> | + | |<div class="tooltip">C3: Legion Sqr. - Rockford Hills<span>[[File:C3 - Legion Sqr. - Rockford Hills.png|none|thumb|600px]]</span></div> |
|Los Santos | |Los Santos | ||
|3 | |3 | ||
| − | | | + | |14 |
| − | | | + | |14 |
|- | |- | ||
| − | |<div class="tooltip"> | + | |<div class="tooltip">C4: Chamberlain Hills - Maze Bank Arena<span>[[File:C4 - Chamberlain Hills - Maze Bank Arena.png|none|thumb|600px]]</span></div> |
|Los Santos | |Los Santos | ||
|3 | |3 | ||
| − | |||
|14 | |14 | ||
| + | |21 | ||
|- | |- | ||
| − | |<div class="tooltip"> | + | |<div class="tooltip">F2: Vespucci Beach - Downtown LS<span>[[File:F2 - Vespucci Beach - Downtown LS.png|none|thumb|600px]]</span></div> |
|Los Santos | |Los Santos | ||
|3 | |3 | ||
| − | | | + | |14 |
|16 | |16 | ||
|- | |- | ||
| − | | | + | |<div class="tooltip">H5: Mirror Park - L.S.I.A<span>[[File:H5 - Mirror Park - L.S.I.A.png|none|thumb|600px]]</span></div> |
|Los Santos | |Los Santos | ||
|3 | |3 | ||
| − | | | + | |14 |
| − | | | + | |14 |
|- | |- | ||
| − | |C5: | + | |<div class="tooltip">C5: Center - L.S.I.A<span>[[File:C5 - Center - L.S.I.A.png|none|thumb|600px]]</span></div> |
|Los Santos | |Los Santos | ||
|4 | |4 | ||
| − | | | + | |21 |
| − | | | + | |20 |
|- | |- | ||
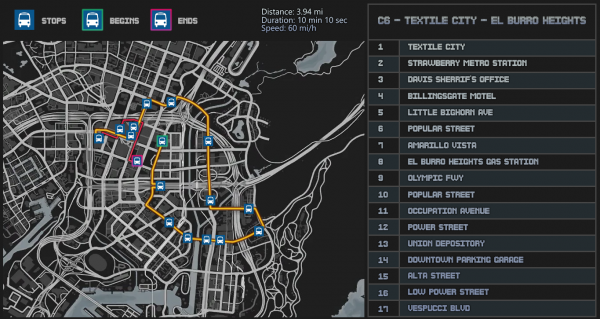
| − | |C6: Textile City - El Burro Heights | + | |<div class="tooltip">C6: Textile City - El Burro Heights<span>[[File:C6 - Textile City - El Burro Heights.png|none|thumb|600px]]</span></div> |
|Los Santos | |Los Santos | ||
|4 | |4 | ||
| − | | | + | |21 |
|17 | |17 | ||
|- | |- | ||
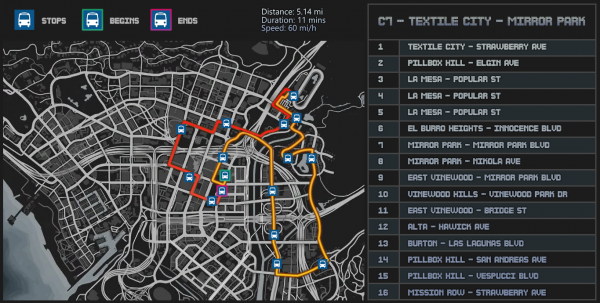
| − | |C7: | + | |<div class="tooltip">C7: Textile City - Mirror Park<span>[[File:C7 - Textile City - Mirror Park.png|none|thumb|600px]]</span></div> |
|Los Santos | |Los Santos | ||
|4 | |4 | ||
| − | | | + | |21 |
|16 | |16 | ||
|- | |- | ||
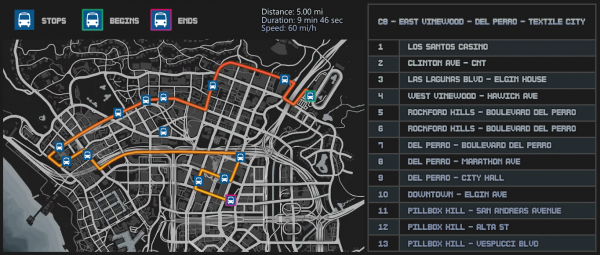
| − | |C8: East Vinewood - Del Perro - Textile City | + | |<div class="tooltip">C8: East Vinewood - Del Perro - Textile City<span>[[File:C8 - East Vinewood - Del Perro - Textile City.png|none|thumb|600px]]</span></div> |
|Los Santos | |Los Santos | ||
|4 | |4 | ||
| − | | | + | |21 |
|13 | |13 | ||
|- | |- | ||
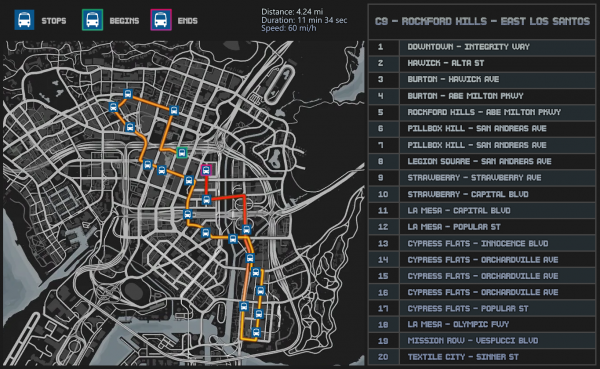
| − | |C9: Rockford Hills - East Los Santos | + | |<div class="tooltip">C9: Rockford Hills - East Los Santos<span>[[File:C9 - Rockford Hills - East Los Santos.png|none|thumb|600px]]</span></div> |
|Los Santos | |Los Santos | ||
|4 | |4 | ||
| − | | | + | |21 |
| − | | | + | |20 |
|- | |- | ||
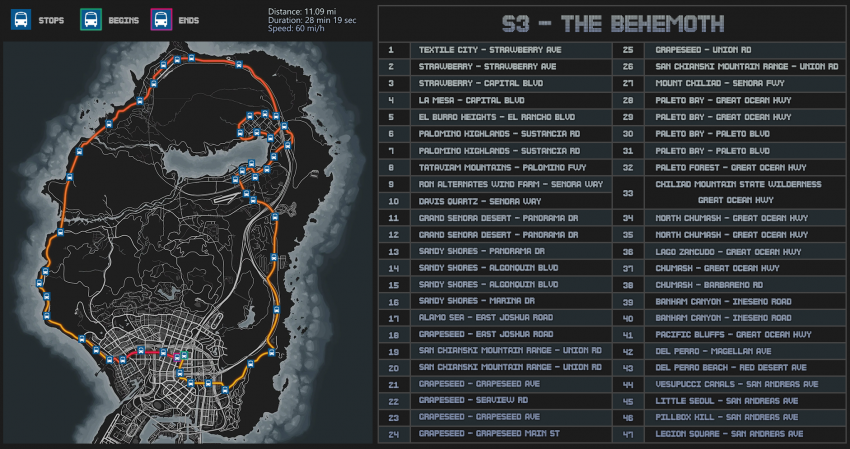
| − | | | + | |<div class="tooltip">S6: The Behemoth<span>[[File:S3 - The Behemoth.png|none|thumb|850px]]</span></div> |
|Los Santos | |Los Santos | ||
|6 | |6 | ||
| − | | | + | |42 |
| − | | | + | |47 |
|- | |- | ||
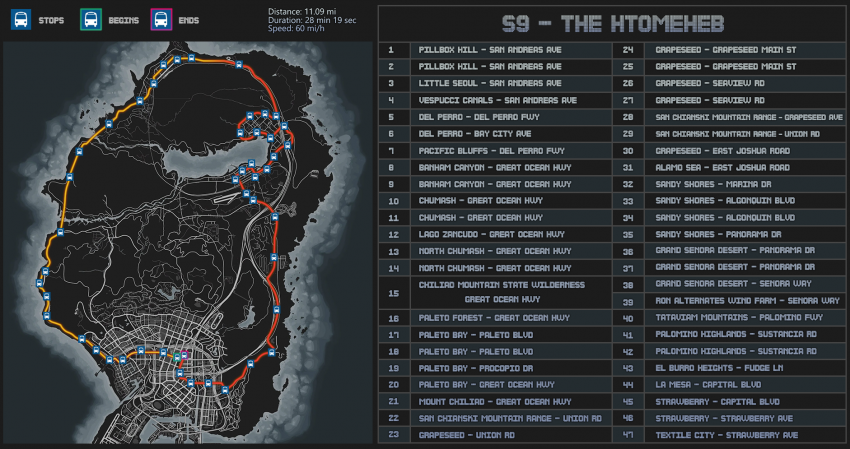
| − | | | + | |<div class="tooltip">S9: The Htomeheb<span>[[File:S9 - The Htomeheb.png|none|thumb|850px]]</span></div> |
|Los Santos | |Los Santos | ||
|6 | |6 | ||
| − | | | + | |42 |
| − | | | + | |47 |
|- | |- | ||
| − | | | + | |} |
| − | | | + | |
| − | | | + | === Sandy Shores / Paleto Bay / Zancudo === |
| − | | | + | {| class="article-table sortable" style="width: 100%;" |
| − | | | + | ! data-sort-type="text" style="width: 40%" |'''Route''' |
| + | ! data-sort-type="text" style="width: 20%" |'''Start''' | ||
| + | ! data-sort-type="number" style="width: 10%" |'''Tier''' | ||
| + | ! data-sort-type="number" style="width: 20%" |'''Level Requirement''' | ||
| + | ! data-sort-type="number" style="width: 10%" |'''Stops''' | ||
|- | |- | ||
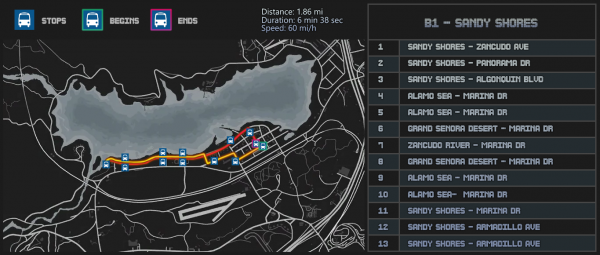
| − | + | |<div class="tooltip">B1: Sandy Shores<span>[[File:B1 - Sandy Shores.png|none|thumb|600px]]</span></div> | |
| − | |||
| − | |||
| − | |||
| − | |||
| − | |||
| − | |||
| − | |||
| − | |||
| − | |||
| − | |||
| − | |||
| − | |||
| − | |||
| − | |||
| − | |||
| − | |||
| − | |||
| − | |<div class="tooltip">B1: Sandy Shores<span>[[File:B1 - Sandy Shores.png|none|thumb| | ||
|Sandy Shores | |Sandy Shores | ||
| − | | | + | |3 |
|14 | |14 | ||
|13 | |13 | ||
|- | |- | ||
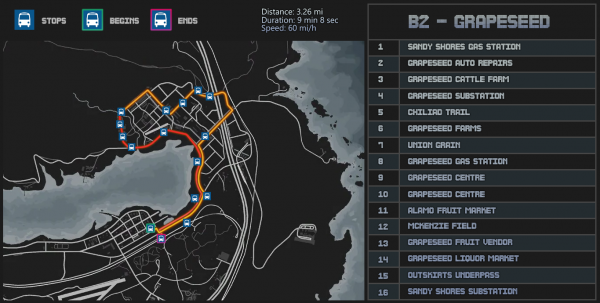
| − | |<div class="tooltip">B2: Grapeseed<span>[[File:B2 - Grapeseed.png|none|thumb| | + | |<div class="tooltip">B2: Grapeseed<span>[[File:B2 - Grapeseed.png|none|thumb|600px]]</span></div> |
|Sandy Shores | |Sandy Shores | ||
| − | | | + | |3 |
|14 | |14 | ||
|16 | |16 | ||
|- | |- | ||
| − | |<div class="tooltip">B3: Harmony<span>[[File:B3_-_Harmony.png|none|thumb| | + | |<div class="tooltip">B3: Harmony<span>[[File:B3_-_Harmony.png|none|thumb|600px]]</span></div> |
|Sandy Shores | |Sandy Shores | ||
| − | | | + | |3 |
|14 | |14 | ||
|18 | |18 | ||
|- | |- | ||
| − | |<div class="tooltip">B4: | + | |<div class="tooltip">B4: San Chianski<span>[[File:B4 - San Chianski.png|none|thumb|600px]]</span></div> |
|Sandy Shores | |Sandy Shores | ||
| − | | | + | |3 |
|14 | |14 | ||
| − | | | + | |11 |
| + | <!-- | ||
|- | |- | ||
| − | |<div class="tooltip">B5: | + | |<div class="tooltip">B5: Zancudo River<span>[[File:B4 - Zancudo River.png|none|thumb|300px]]</span></div> |
|Sandy Shores | |Sandy Shores | ||
| − | | | + | |3 |
|14 | |14 | ||
| − | | | + | |19 |
| + | --> | ||
|- | |- | ||
| − | |<div class="tooltip">P1: Paleto Bay<span>[[File:P1 - Paleto Bay.png|none|thumb| | + | |<div class="tooltip">P1: Paleto Bay<span>[[File:P1 - Paleto Bay.png|none|thumb|600px]]</span></div> |
|Paleto Bay | |Paleto Bay | ||
| − | | | + | |3 |
|14 | |14 | ||
|13 | |13 | ||
|- | |- | ||
| − | |<div class="tooltip">Z1: Zancudo<span>[[File:Z1 - Zancudo.png|none|thumb| | + | |<div class="tooltip">Z1: Zancudo<span>[[File:Z1 - Zancudo.png|none|thumb|600px]]</span></div> |
|Zancudo | |Zancudo | ||
| − | | | + | |3 |
| + | |14 | ||
| + | |18 | ||
| + | |- | ||
| + | |} | ||
| + | ==Milestones== | ||
| + | {| class="article-table sortable" style="width: 100%;" | ||
| + | ! data-sort-type="text" style="width: 40%" |'''Unlock''' | ||
| + | ! data-sort-type="number" style="width: 20%" |'''Bus Driver Level Requirement''' | ||
| + | |- | ||
| + | |You can now use the Rental Bus | ||
| + | |1 | ||
| + | |- | ||
| + | |You now have access to R1, R2, and R3 Routes | ||
| + | |1 | ||
| + | |- | ||
| + | |You now have access to the Tour Bus | ||
| + | |7 | ||
| + | |- | ||
| + | |You now have access to M1, M2, M3, M4, M5, and M6 Routes | ||
| + | |7 | ||
| + | |- | ||
| + | |You now have access to the Bus | ||
|14 | |14 | ||
| − | |||
|- | |- | ||
| − | | | + | |You now have access to C1, C2, C3, C4, F2, H5, B1, B2, B3, B4, P1, and Z1 Routes |
| − | |||
| − | |||
| − | |||
|14 | |14 | ||
|- | |- | ||
| − | | | + | |You now have access to the Airport Bus |
| − | | | + | |21 |
| − | |||
| − | |||
| − | |||
|- | |- | ||
| − | | | + | |You now have access to C5, C6, C7, C8, and C9 Routes |
| − | | | + | |21 |
| − | |||
| − | |||
| − | |||
|- | |- | ||
| − | | | + | |You now have access to the Dashound Coach |
| − | | | + | |42 |
| − | |||
| − | |||
| − | |||
|- | |- | ||
| − | | | + | |You now have access to S6 and S9 Routes |
| − | | | + | |42 |
| − | |||
| − | |||
| − | |||
|- | |- | ||
| − | | | + | |You now have access to the Double Decker |
| − | | | + | |69 |
| − | |||
| − | |||
| − | |||
|} | |} | ||
| − | |||
{{DEFAULTSORT:Bus Driver}} | {{DEFAULTSORT:Bus Driver}} | ||
[[Category:Jobs]] | [[Category:Jobs]] | ||
[[Category:Browse]] | [[Category:Browse]] | ||
Latest revision as of 18:47, 30 October 2024
The Bus Driver
job (and skill) is a small and calm job. You transport passengers anywhere and everywhere, depending on the level of your bus. It is an easy job for new players in Transport Tycoon!
Contents
Getting Started
- Go to the Job Center
 and choose the bus driver job.
 - Buy a bus from the Car Dealership
 .
. - Drive to one of the bus stations
 .
. - At the bus station, there you can start a route with your bus.
- Stop at the locations on your map, follow the line on your map for the correct stations
 and wait for passengers to get in and out.
 - You get paid during, and at the end of your route.
If you can not afford to buy a bus, find one on the street, at the bus station, near LSIA or ask someone to borrow their bus!
The number of stops on your route determines how much XP you get at the end of your route. Money is still different and depends on the number of stops you have on the route, but two things are for sure, the higher level your bus is, the more money, EXP, and EXP Tokens you will earn
Not every bus can do every route, for example, due to low roofs.
Vehicles
| Name | Level Requirement* | Tier | Price | Fuel |
|---|---|---|---|---|
| 1 | $25,000 | 280L (Diesel) | ||
| 7 | T2 | $50,000 | 280L (Diesel) | |
| 14 | T3 | $110,000 | 280L (Diesel) | |
| 21 | T4 | $225,000 | 280L (Diesel) | |
| 42 | T5 | $38,000,000 | 280L (Diesel) | |
| Double Decker | 69 | T6 | $86,000,000 | 280L (Diesel) |
- Level Requirement = Bus Skill
Routes
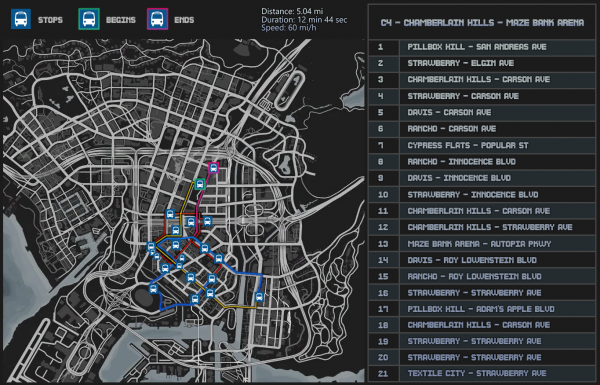
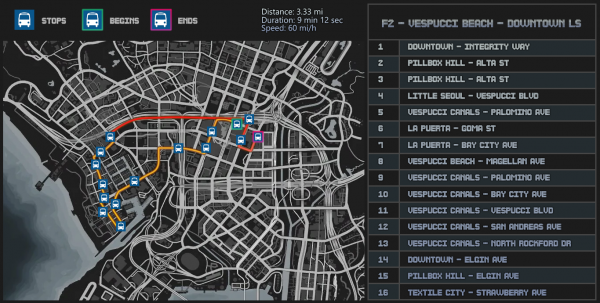
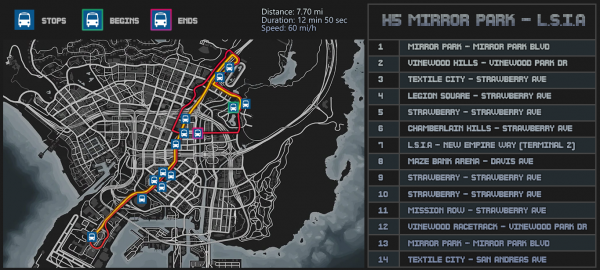
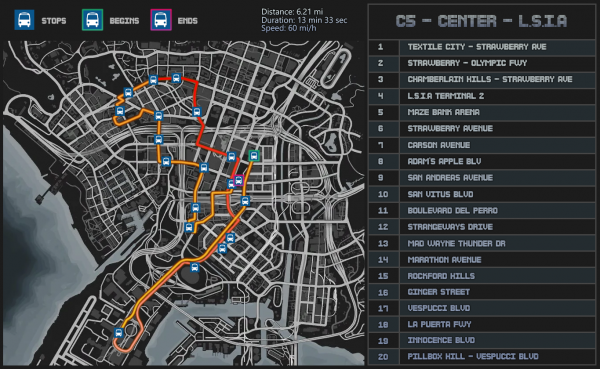
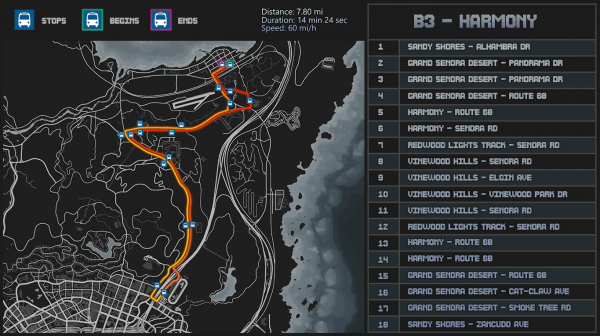
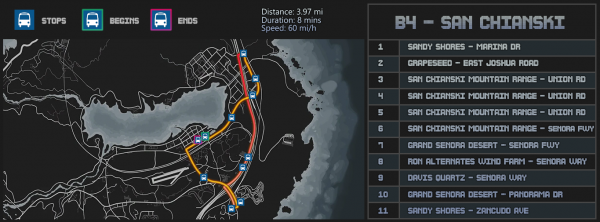
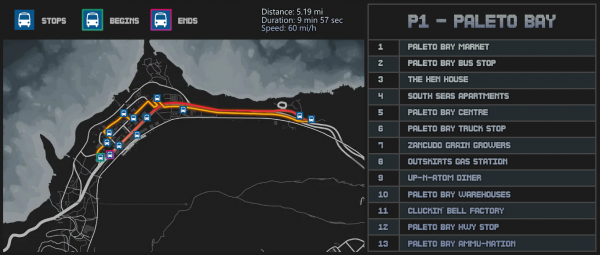
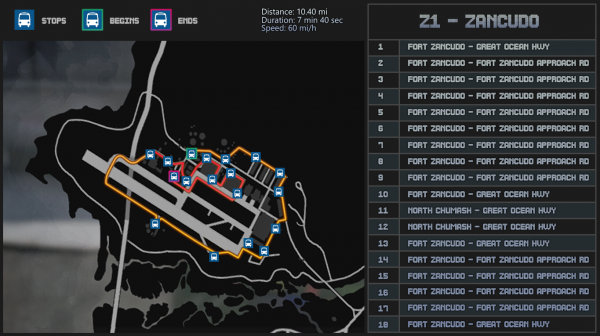
Hover over the route names to see the route maps.
Los Santos
| Route | Start | Tier | Level Requirement | Stops |
|---|---|---|---|---|
| Los Santos | 1 | 1 | 24 | |
| Los Santos | 1 | 1 | 20 | |
| Los Santos | 1 | 1 | 23 | |
| Los Santos | 2 | 7 | 20 | |
| Los Santos | 2 | 7 | 26 | |
| Los Santos | 2 | 7 | 14 | |
| Los Santos | 2 | 7 | 22 | |
| Los Santos | 2 | 7 | 18 | |
| Los Santos | 2 | 7 | 22 | |
| Los Santos | 3 | 14 | 18 | |
| Los Santos | 3 | 14 | 16 | |
| Los Santos | 3 | 14 | 14 | |
| Los Santos | 3 | 14 | 21 | |
| Los Santos | 3 | 14 | 16 | |
| Los Santos | 3 | 14 | 14 | |
| Los Santos | 4 | 21 | 20 | |
| Los Santos | 4 | 21 | 17 | |
| Los Santos | 4 | 21 | 16 | |
| Los Santos | 4 | 21 | 13 | |
| Los Santos | 4 | 21 | 20 | |
| Los Santos | 6 | 42 | 47 | |
| Los Santos | 6 | 42 | 47 |
Sandy Shores / Paleto Bay / Zancudo
| Route | Start | Tier | Level Requirement | Stops |
|---|---|---|---|---|
| Sandy Shores | 3 | 14 | 13 | |
| Sandy Shores | 3 | 14 | 16 | |
| Sandy Shores | 3 | 14 | 18 | |
| Sandy Shores | 3 | 14 | 11 | |
| Paleto Bay | 3 | 14 | 13 | |
| Zancudo | 3 | 14 | 18 |
Milestones
| Unlock | Bus Driver Level Requirement |
|---|---|
| You can now use the Rental Bus | 1 |
| You now have access to R1, R2, and R3 Routes | 1 |
| You now have access to the Tour Bus | 7 |
| You now have access to M1, M2, M3, M4, M5, and M6 Routes | 7 |
| You now have access to the Bus | 14 |
| You now have access to C1, C2, C3, C4, F2, H5, B1, B2, B3, B4, P1, and Z1 Routes | 14 |
| You now have access to the Airport Bus | 21 |
| You now have access to C5, C6, C7, C8, and C9 Routes | 21 |
| You now have access to the Dashound Coach | 42 |
| You now have access to S6 and S9 Routes | 42 |
| You now have access to the Double Decker | 69 |


